Tattoo Shading How To: Master Professional Techniques
Mastering the art of tattoo shading transforms flat line work into three-dimensional masterpieces that captivate and endure. Understanding tattoo shading how to techniques separates amateur work from professional artistry, particularly in fine line and detailed designs where subtle gradations create depth and realism. Whether you're an aspiring artist or a collector seeking to appreciate the craft behind luxury tattoo work, grasping these fundamental principles elevates your perspective on what makes exceptional body art.
Essential Foundation for Tattoo Shading
Before diving into specific techniques, establishing a solid foundation in shading principles ensures consistent, professional results. The core elements include needle configuration, machine voltage, hand speed, and skin tension management.
Needle selection directly impacts shading quality. Round shaders work best for soft gradients, while magnum configurations excel at covering larger areas efficiently. Most professional artists stock multiple needle groupings to achieve different effects:
3-5 round shaders: Delicate transitions and fine detail work
7-9 round shaders: Medium coverage with controlled blending
5-9 magnum shaders: Broad area coverage and smooth gradients
Curved magnums: Following body contours for natural flow
Machine voltage requires precise calibration based on the shading technique employed. Lower voltages (6-8 volts) suit gentle whip shading, while packing techniques demand higher settings (8-10 volts) for solid saturation. Three essential tattoo shading techniques form the backbone of professional work, each serving distinct artistic purposes.
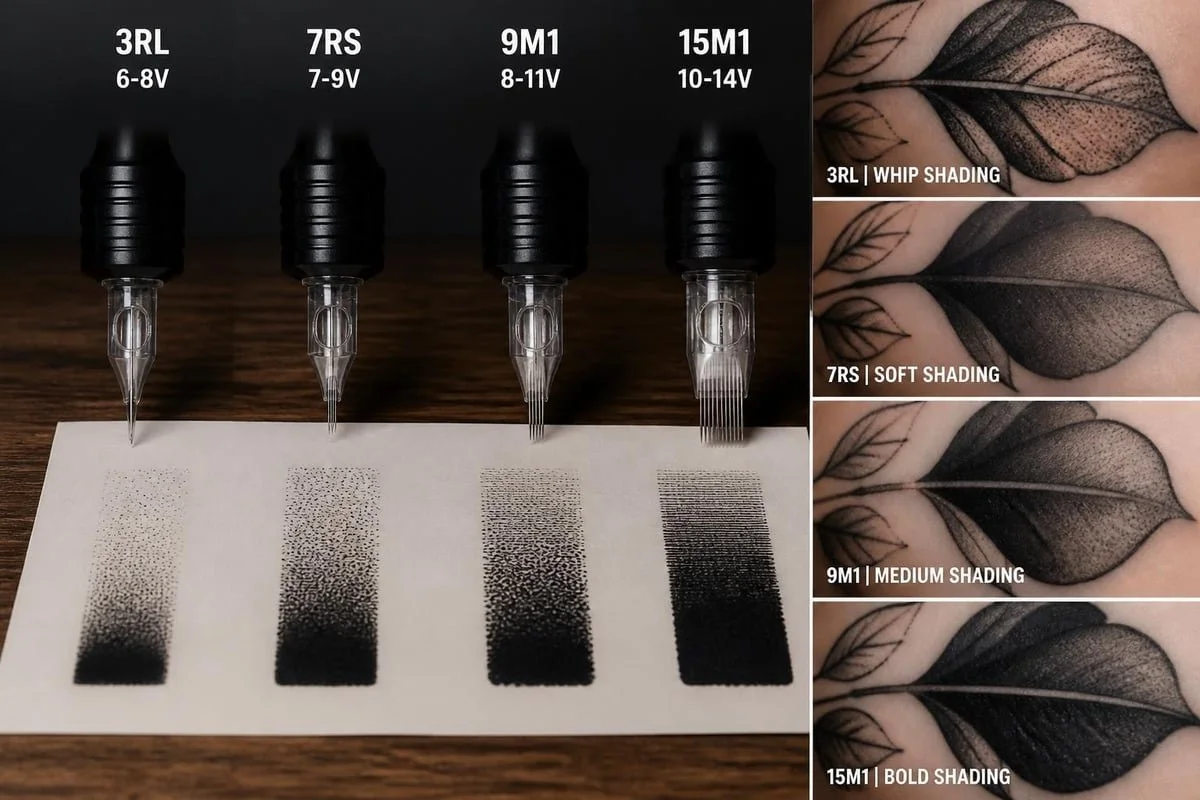
needle configurations and voltage settings
Skin Preparation and Angle Consistency
Proper skin preparation prevents blowouts and ensures even ink distribution throughout the shading process. Stretch the skin firmly but not excessively, maintaining consistent tension as you work. The needle angle should remain between 45 and 75 degrees relative to the skin surface, adjusting based on body contour and desired effect.
Hand stability separates smooth gradients from patchy, inconsistent shading. Anchor your hand against the client's body whenever possible, using your pinky finger as a stabilizing point. This technique becomes particularly crucial when creating detailed fine line work that demands precision and control.
Mastering Whip Shading Technique
Whip shading creates the softest, most natural gradients by lifting the machine away from the skin at the end of each pass. This controlled motion produces a gradual fade from dark to light, perfect for realistic portraits and subtle dimensional effects.
The motion begins with full contact at the darkest point. Maintain steady downward pressure while moving the machine forward, then gradually lift it away from the skin in a smooth arc. The "whip" motion should feel natural and fluid, not jerky or hesitant.
Step-by-Step Whip Shading Process
Start at maximum saturation point: Plant the needle firmly where darkest value is needed
Maintain consistent speed: Move forward at steady pace without pausing
Execute the lift: Gradually raise the machine as you approach the transition zone
Feather the edge: The final contact point should barely kiss the skin
Overlap strategically: Each subsequent pass should overlap approximately 50% with the previous stroke
Practice this technique on synthetic skin before working on clients, focusing on achieving uniform gradients without banding or harsh lines. Understanding proper technique helps clients appreciate the skill investment required for quality shading work.
The angle of lift determines gradient steepness. A gradual lift over several centimeters creates subtle transitions, while a quick lift produces more dramatic fades. Experiment with both approaches to build versatility in your shading repertoire.
Pendulum Shading for Controlled Gradients
Pendulum shading employs an arcing, side-to-side motion similar to a clock pendulum, building up value through repeated passes. This tattoo shading how to method offers exceptional control over gradient placement and intensity, making it ideal for geometric designs and structured shading.
The pendulum motion creates consistent, predictable results. Start at one edge of the shading area, moving the machine in small arcs while progressing forward. Each arc overlaps the previous one, gradually building density and depth.
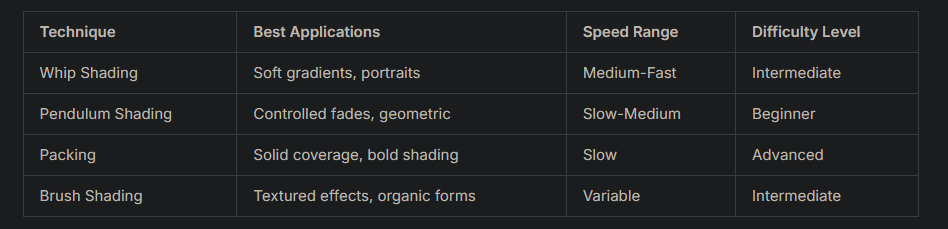
Optimizing Pendulum Motion
The arc width directly correlates with gradient smoothness. Wider arcs (2-3 centimeters) produce gentler transitions, while tight arcs (0.5-1 centimeter) create more concentrated shading. Adjust your arc pattern based on the area size and desired effect.
Hand pressure remains constant throughout the pendulum motion, unlike whip shading where pressure decreases during the lift. This consistency makes pendulum shading more forgiving for beginners learning tattoo shading how to fundamentals. Comprehensive shading techniques for beginners provide additional guidance on mastering this approach.
Packing Technique for Solid Saturation
Packing delivers maximum ink saturation for bold, solid shading effects. This technique involves moving the machine in tight circular or linear motions while maintaining constant skin contact, building density through repeated passes over the same area.
Successful packing requires patience and precision. Rush the process, and you'll create inconsistent patches and potential skin trauma. Work methodically, allowing the skin to accept ink before adding additional layers.
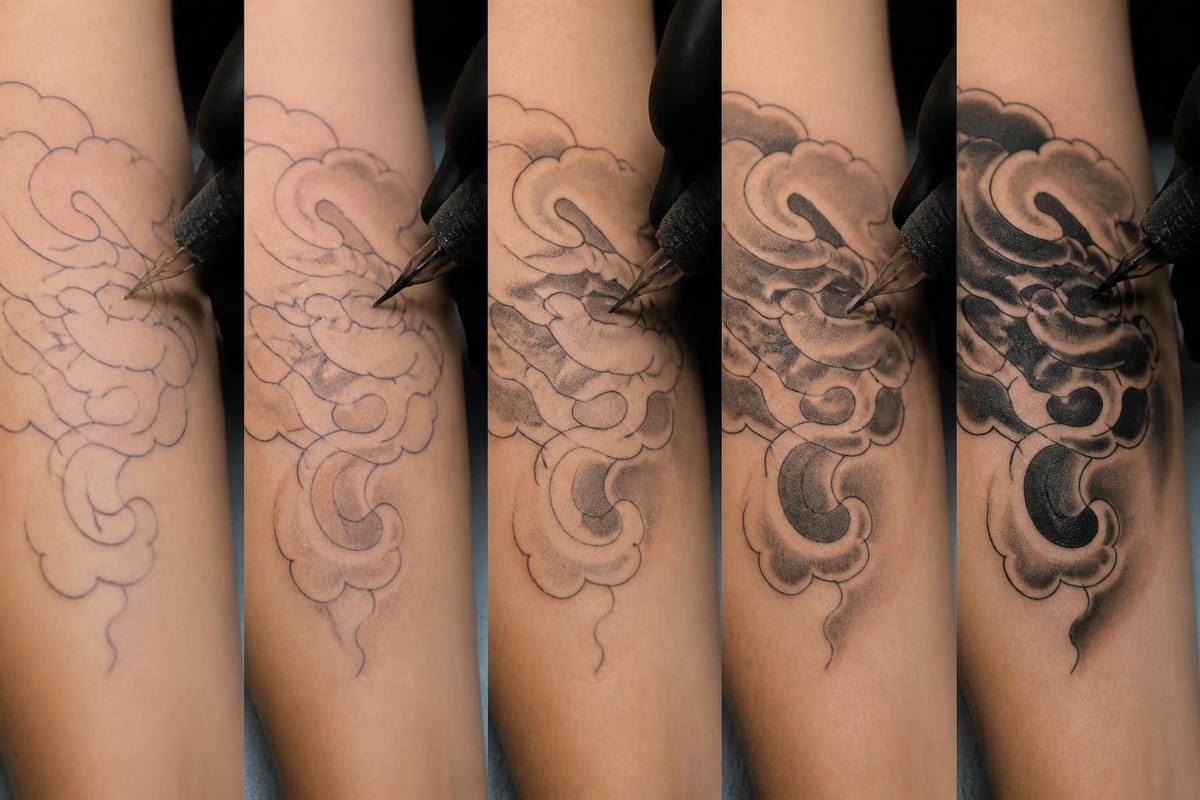
Packing technique progression
The circular motion used in packing resembles polishing, with small, overlapping circles covering the entire shading zone. Each pass should overlap significantly with previous coverage, ensuring no gaps or light spots remain visible. Professional artists typically complete 3-5 passes to achieve solid black, adjusting based on skin type and ink absorption.
Managing Skin Trauma During Packing
Packing places more stress on skin tissue than other shading methods due to concentrated, repeated passes. Monitor skin reaction carefully, watching for excessive swelling or bleeding that indicates overworking. Allow the skin to settle between passes, using this time to clean excess ink and assess coverage quality.
Diluted black ink creates gray tones for graduated packing effects. Common shading mistakes and solutions often relate to ink dilution ratios, with proper mixing preventing muddy or inconsistent results.
Advanced Gray Wash Techniques
Gray wash shading utilizes pre-diluted black ink to create smooth tonal gradations without relying solely on technique variation. Professional artists maintain multiple wash bottles with different dilution ratios, typically ranging from 10% black (light gray) to 70% black (deep charcoal).
Creating a gray wash set requires precision and consistency. Use distilled water or specialized dilution solution, measuring ratios carefully to ensure repeatable results across sessions. Most artists prepare at least five distinct values:
Wash 1: 10-15% black for highlights and lightest values
Wash 2: 25-30% black for light midtones
Wash 3: 40-50% black for medium values
Wash 4: 60-65% black for dark midtones
Wash 5: 75-80% black for deep shadows
Layering different wash values creates dimension and depth impossible to achieve with single-tone shading. Start with lightest values, building toward darker tones gradually. This approach prevents over-saturation and allows for subtle corrections during the process.
Blending Multiple Wash Values
Transition zones between wash values require careful blending to avoid visible lines or banding. Overlap each value approximately one centimeter into the adjacent tone, using whip or pendulum technique to soften the edge. Choosing colors and tones follows similar principles, whether working in grayscale or full color.
Work wet-to-dry when blending, meaning complete one section fully before moving to adjacent areas. This prevents ink from migrating into partially healed tissue, which can cause blurred edges and inconsistent healing results.
Equipment Settings and Optimization
Machine configuration significantly impacts shading quality and efficiency. Rotary machines offer smooth, consistent performance ideal for controlled shading work, while coil machines provide the snap and power preferred for packing techniques.
Voltage adjustments accommodate different techniques and skin types. Thicker skin requires higher voltage for adequate penetration, while delicate areas like inner arms or ribs need gentler settings to prevent trauma. Start conservative and increase gradually based on ink deposition and skin reaction.
Needle Depth Calibration
Proper needle depth sits between 1-2 millimeters, reaching the dermis without excessive trauma. Too shallow, and ink won't hold; too deep, and you risk scarring and blowouts. Adjust needle protrusion based on skin elasticity and area thickness.
Most professional artists set needles approximately 2 millimeters beyond the tube tip for shading work, slightly less than lining depth. Understanding what happens during your tattoo session helps clients appreciate these technical considerations that ensure optimal results.
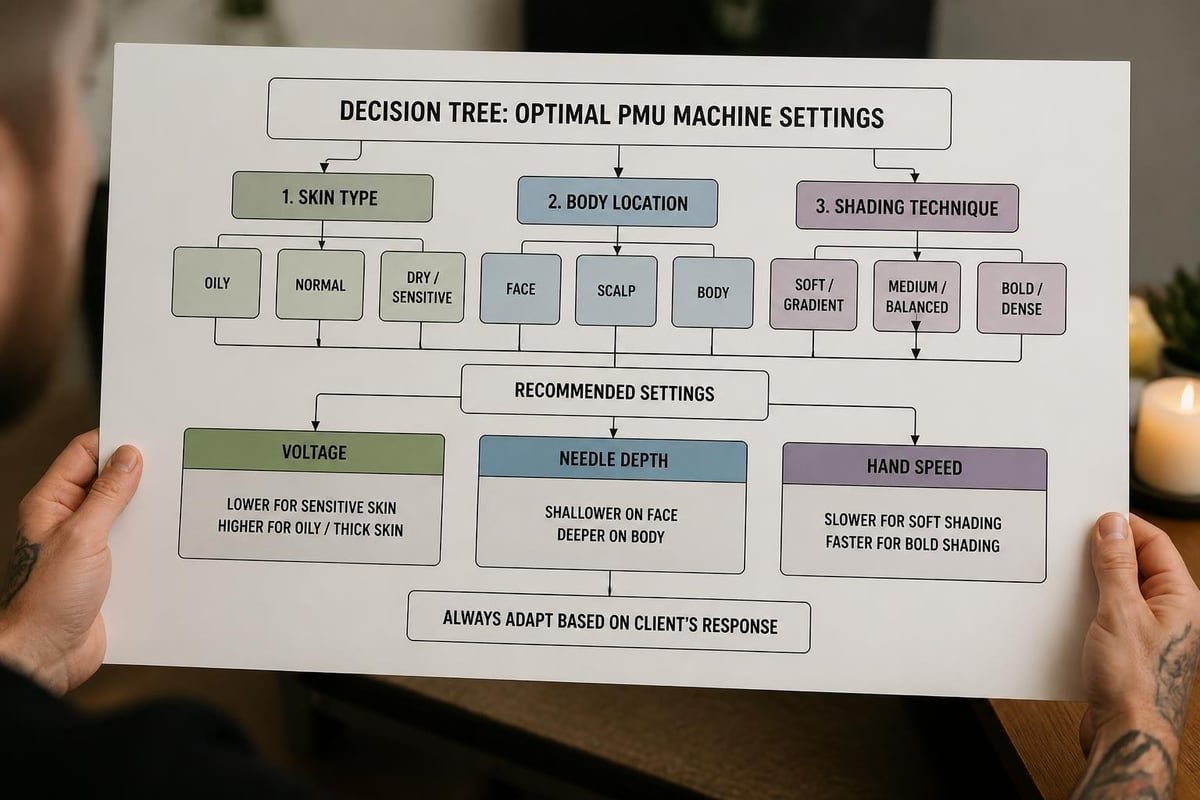
Machine settings workflow
Troubleshooting Common Shading Issues
Even experienced artists encounter shading challenges requiring quick problem-solving and technical adjustment. Recognizing issues early prevents extensive rework and ensures client satisfaction.
Patchy or inconsistent shading indicates insufficient skin stretch or uneven hand pressure. Reassess your stabilization technique, ensuring consistent tension throughout the shading area. Consider switching to a smaller needle configuration for better control in problematic zones.
Excessive bleeding suggests too much trauma from high voltage, excessive pressure, or overworking. Reduce voltage by one volt increments, lighten hand pressure, and allow more time between passes. Some bleeding is normal, but pooling blood obscures visibility and indicates the need for adjustment.
Addressing Blowouts and Ink Migration
Blowouts occur when ink deposits too deep, spreading beneath the tattoo layer in blurred patches. Prevention requires proper needle depth, appropriate angle consistency, and avoiding excessive pressure on thin-skinned areas. Tattoo placement considerations should account for skin thickness variations across body regions.
If a blowout occurs during the session, document it immediately and adjust technique for the remaining work. Blowouts typically become more visible during healing as swelling subsides, so honest communication with clients about correction options maintains trust and professionalism.
Building Shading Consistency and Speed
Professional efficiency in tattoo shading how to techniques develops through deliberate practice and self-analysis. Recording your sessions (with client permission) allows detailed review of hand positioning, speed consistency, and technique execution.
Set specific practice goals for each synthetic skin session. Rather than random shading, replicate challenging sections from actual designs, focusing on smooth gradients, consistent coverage, and clean edges. Track improvement through dated practice pieces, creating a visual progression record.
Speed increases naturally as muscle memory develops, but never sacrifice quality for speed. Clients seeking luxury tattoo experiences value precision and artistry over rushed completion.
Creating a Personal Technique Reference
Document your preferred settings, needle configurations, and technique approaches for different shading scenarios. This reference guide ensures consistency across sessions and provides a foundation for training junior artists or refining your approach.
Include photos of successful shading examples categorized by technique, noting specific settings and conditions that produced optimal results. Exploring different tattoo styles requires adapting these core techniques to style-specific demands and aesthetic expectations.
Integration with Overall Design Composition
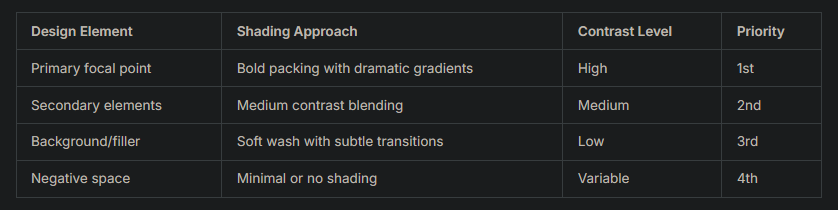
Shading never exists in isolation but supports the overall design narrative and visual flow. Strategic shading placement directs viewer attention, creates focal points, and enhances compositional balance.
High contrast shading draws immediate attention, making it ideal for primary design elements. Reserve your darkest values and most dramatic gradients for areas requiring emphasis, using subtler shading in supporting elements.
Consider light source consistency throughout the design. Establishing a single directional light source (even if abstract) creates cohesive, believable dimension across the entire piece. Shadows and highlights should align with this chosen direction for maximum realism and impact.
Balancing Detail and Readability
Over-shading creates muddy, illegible designs that lose impact over time and distance. Maintain adequate negative space and contrast variation to ensure the design reads clearly from several feet away. Fine line tattoo work particularly benefits from restrained, strategic shading that enhances rather than overwhelms delicate line work.
Test design readability by viewing reference drawings from varying distances, ensuring primary elements remain clear even when details blur. This approach guarantees the tattoo maintains visual impact regardless of viewing context or aging.
Advanced Color Shading Principles
While this article focuses on black and gray shading techniques, color shading follows identical mechanical principles with additional complexity in hue selection and mixing. Understanding tattoo shading how to fundamentals in grayscale provides the perfect foundation for color work.
Color shading requires value matching beyond hue selection. A color may appear vibrant but lack sufficient value contrast to create effective dimension. Convert your color design to grayscale mentally or digitally to verify adequate tonal separation exists between shaded and highlighted areas.
Dilution principles apply to color inks identically to black, with lighter values achieved through mixing with white ink or dilution solution. Build color density gradually through multiple passes rather than attempting full saturation in a single application.